Match the exact chassis and mounting system first. Check dimensions and moving clearance before any irreversible cut or paint.
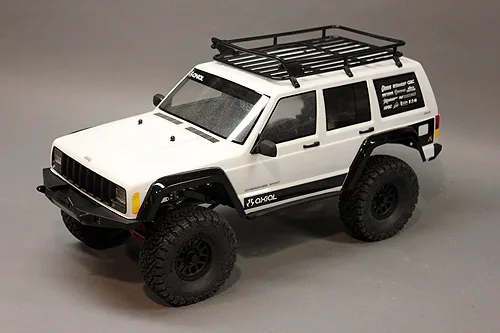
Manufacturer workshop image: finished, decaled Axial Jeep Cherokee shell installed on its crawler.
Finished specific Axial Jeep Cherokee build; it documents a result, not a universal decal-placement or shell-fit procedure.
Axial Adventure; AX90046 SCX10 II Jeep Cherokee Kit Build Series – Part 9 (photographer not identified) · Manufacturer copyright; permission required before public release
Photo credit & source ↗View the teaching schematic
A body can look perfect in a photograph and still be the wrong starting point for your car. Treat shell selection as a small fit project: identify the chassis, write down the dimensions that matter, and leave cutting and painting until the uncertain parts are resolved. A scale label helps you browse; it is not a complete compatibility statement.
Start with a fit sheet
Write the chassis name, revision, wheel and tire combination, and mounting arrangement at the top of a page. Record the existing shell's part number if available. Separate measurements you took from dimensions printed by the manufacturer. If a dimension is missing, mark it unknown rather than estimating it from a perspective photograph.
| Check | What to compare | Decision it supports |
|---|---|---|
| Wheelbase | Front-to-rear axle centres versus the shell's intended wheelbase | Whether both arches can align |
| Width | Shell width versus the actual wheel/tire envelope | Whether the wheels sit where the design expects |
| Mounts | Posts, clips, clipless fittings or body-specific hardware | Whether attachment is supported |
| Clearance | Steering sweep, suspension travel and internal equipment | Whether the shell can stay clear during use |
Use the scale guide for context, then return to millimetres and exact part numbers. A different wheel offset or mounting conversion belongs on the fit sheet too.
A real example of a precise description
Tamiya's 51467 CR-X body listing specifies a 225 mm wheelbase, 170 mm width and 366 mm overall length. It also lists chassis associations and a tire/wheel condition for MF-01X. Those are manufacturer specifications, not our fit test. They are more useful than the page's 1/10 label alone, and any chassis-specific conditions still need checking against your configuration.
Imagine a hypothetical chassis measured at 257 mm wheelbase. Against a body intended for 225 mm, the difference is 32 mm. Centring the shell would distribute that mismatch between the two ends; drilling different post holes does not change the distance between its wheel arches. That calculation is a reason to stop and find the appropriate shell, not a recommendation to enlarge the arches until it works.
Make the first fitting reversible
With the vehicle switched off and its battery disconnected, compare the unpainted shell with the chassis using the body maker's instructions. Keep protective film in place where specified. Do not assume moulded dots are correct for every chassis version. Pro-Line's body preparation tutorial shows positioning the shell and marking body posts and wheel wells before paint when suitable markings are absent.
For your project, photograph the position from directly above and both sides. Note what you can actually verify while the shell is untrimmed, and what still requires the instructed trimming stage. Check left and right, not just the flattering side. Keep hands away from cutting edges; younger builders need adult help with cutting and reaming tools.
Decide what kind of project this is
A supported replacement shell and a custom adaptation are different commitments. For a replacement, unresolved mount compatibility is a reason to pause. For a custom project, list every required bracket, clearance change and access tradeoff before spending money. Do not label a custom adaptation as manufacturer-approved fit.
Leave room to reach the battery latch, switch and body releases. Record whether the desired appearance compromises those jobs. Once the fit is settled, move to the paint plan and then the decal layout guide. Finishing is more enjoyable when the shell already belongs on the car.
Leave with a useful record.
This is a reading aid, not a safety certification. Checks stay only on this page and reset when you reload.
Sources & scope
Primary references checked September 19, 2026. These dates describe source review, not publication of this site. Examples labelled hypothetical or illustrative are not tests.
Tamiya — SP.1467 Honda CR-X PRO body parts set
Supports: 225 mm wheelbase, 170 mm width, 366 mm length; Manufacturer chassis associations include conditions.
Limit: Manufacturer specifications; no independent fit test. Prices and availability omitted.
Source publication: not established · Checked: 2026-09-19
Pro-Line Racing — Body painting and preparation tutorial
Supports: Position and mark body posts and wheel wells before paint when necessary.
Limit: Generic tutorial, not compatibility confirmation for an individual shell.
Source publication: not established · Checked: 2026-09-19